Configure External Access through LoadBalancer Services
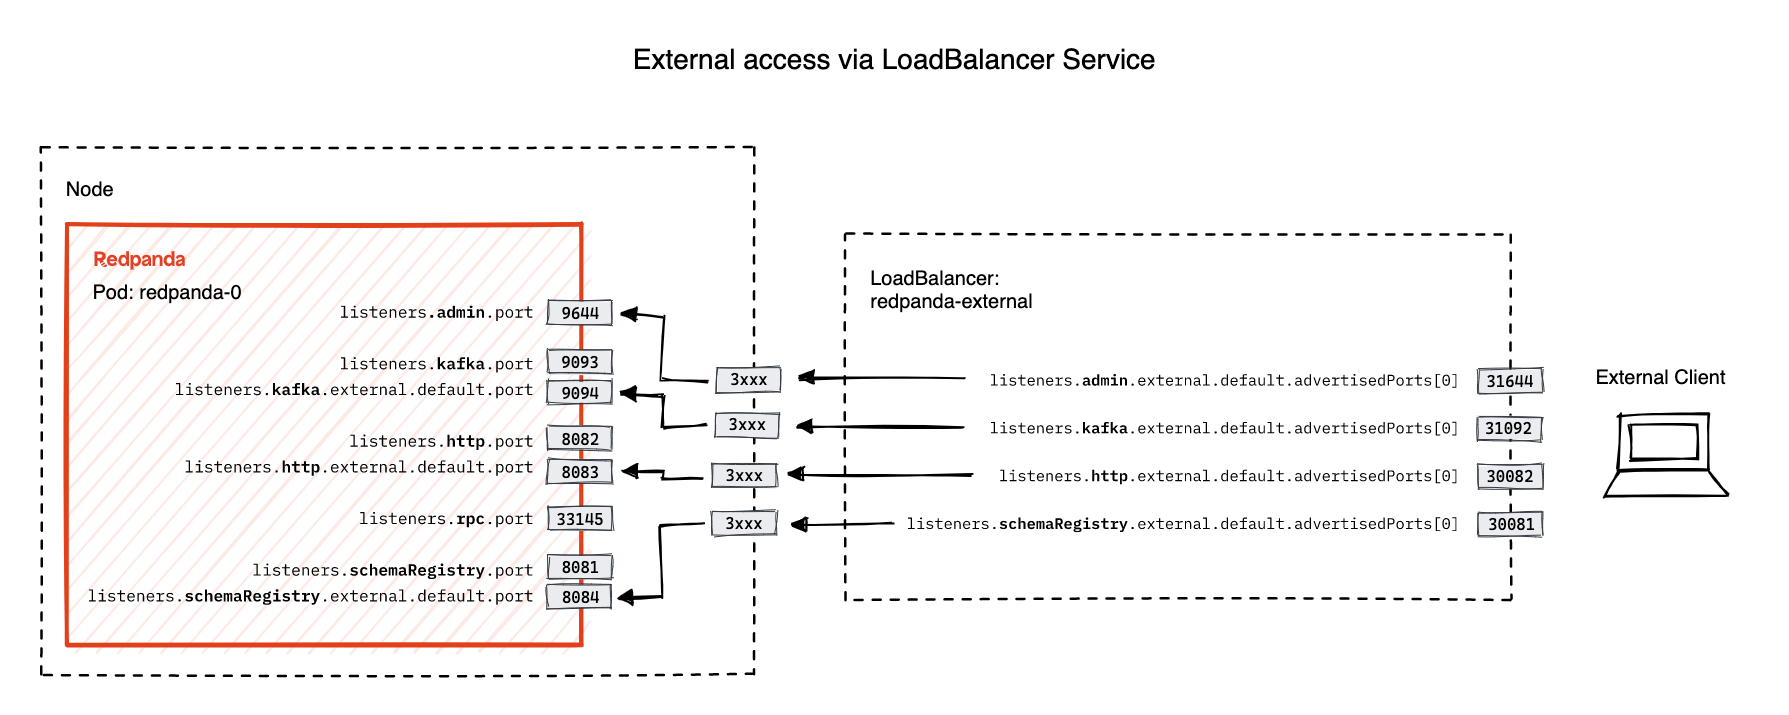
When the external.type field is set to LoadBalancer, the Helm chart creates one LoadBalancer Service for each replica in the StatefulSet. Each LoadBalancer Service routes traffic to the external listener ports on a single Redpanda broker. To set up external access using LoadBalancer Services, you must configure the brokers to advertise addresses that resolve to the load balancer instances.
The Helm chart adds the spec.selector.statefulset.kubernetes.io/pod-name setting to each LoadBalancer Service so that each Service targets only one Redpanda broker. Each Pod in a StatefulSet is automatically given the statefulset.kubernetes.io/pod-name label, which contains the name of the Pod. By setting the spec.selector.statefulset.kubernetes.io/pod-name field of the LoadBalancer Service to the name of a Pod, it makes the LoadBalancer Service target only the individual Redpanda broker and not the whole cluster.
|
Prerequisites
-
One worker node for each Redpanda broker that you want to deploy.
-
Install rpk on your local machine so that you can test external connections to your Redpanda cluster from outside Kubernetes.
-
Make sure that your Kubernetes cluster is accessible through your desired node port range. You may need to edit your inbound firewall rules.
-
If you want brokers to advertise a custom domain, you must have control over the DNS settings for that domain.
For internal testing, you can use any domain without owning that domain, as long as:
-
Your local DNS server is configured to resolve that domain to the correct IP address.
-
Your client systems are configured to use your DNS server for resolution.
For production, it’s best to buy a domain from a domain registrar. This way, your domain is resolvable without any additional client-side configuration.
-
Advertise a custom domain
To configure your Redpanda brokers to advertise a custom domain, each broker must also have a hostname that points to the address of the broker’s corresponding load balancer instance.
Your brokers can advertise one of the following hostnames:
-
The default hostnames are
redpanda-<ordinal-number>, whereredpandais the name of the Helm release and the<ordinal-number>placeholder is the Pod ordinal generated by the StatefulSet. -
Custom hostnames override the default. For example, you can configure your brokers to advertise
<hostname-for-broker-0>.<custom-domain>.
Advertise the default Redpanda hostnames
By default, the Helm chart gives each broker a hostname that consists of the Helm release and the Pod ordinal. For example, redpanda-0, where redpanda is the Helm release and 0 is the Pod ordinal. To configure brokers to advertise these hostnames, you must configure the brokers with a custom domain.
-
Specify your domain and optional subdomains in the
external.domainconfiguration.Replace
<custom-domain>with your domain.-
Helm + Operator
-
Helm
redpanda-cluster.yamlapiVersion: cluster.redpanda.com/v1alpha1 kind: Redpanda metadata: name: redpanda spec: chartRef: {} clusterSpec: external: enabled: true domain: <custom-domain> type: LoadBalancerkubectl apply -f redpanda-cluster.yaml --namespace <namespace>-
--values
-
--set
custom-domain.yamlexternal: enabled: true domain: <custom-domain> type: LoadBalancerhelm upgrade --install redpanda redpanda/redpanda --namespace <namespace> --create-namespace \ --values custom-domain.yaml --reuse-values --waithelm upgrade --install redpanda redpanda/redpanda --namespace <namespace> --create-namespace \ --set external.enabled=true \ --set external.type=LoadBalancer \ --set external.domain=<custom-domain> \ --wait -
-
Create DNS records for each of your broker’s FQDNs, relative to the zone.
Advertise custom hostnames
You can give each Redpanda broker a custom hostname to advertise instead of the default hostnames. Custom hostnames can either be suffixed with the Pod ordinal or they can be fully custom.
Advertise custom hostnames suffixed with the Pod ordinal
-
Configure the chart name with your chosen hostname.
Replace
<custom-domain>with your domain, and replace<custom-hostname>with your hostname.-
Helm + Operator
-
Helm
redpanda-cluster.yamlapiVersion: cluster.redpanda.com/v1alpha1 kind: Redpanda metadata: name: redpanda spec: chartRef: {} clusterSpec: fullnameOverride: <custom-hostname> external: enabled: true type: LoadBalancer domain: <custom-domain>kubectl apply -f redpanda-cluster.yaml --namespace <namespace>-
--values
-
--set
custom-hostname-ordinal.yamlfullnameOverride: <custom-hostname> external: enabled: true type: LoadBalancer domain: <custom-domain>helm upgrade --install redpanda redpanda/redpanda --namespace <namespace> --create-namespace \ --values custom-hostname-ordinal.yaml --reuse-values --waithelm upgrade --install redpanda redpanda/redpanda --namespace <namespace> --create-namespace \ --set external.enabled=true \ --set external.type=LoadBalancer \ --set external.domain=<custom-domain> \ --set fullnameOverride=<custom-hostname> \ --waitThis configuration renames your Pods to
<hostname>-<pod-ordinal>. Your Redpanda brokers will advertise the<hostname>-<pod-ordinal>.<custom-domain>address. -
-
Create DNS records for each of your broker’s FQDNs, relative to the zone.
Advertise fully custom hostnames
-
Add each hostname to the
external.addressessetting.Replace
<custom-domain>with your domain, and replace the placeholders in theexternal.addressessetting with your own hostname in the order that you want them to be applied to the Redpanda brokers. The hostnames must be given to each Redpanda broker in order of the StatefulSet replicas. For example, the Redpanda broker running inside theredpanda-0Pod advertises<hostname-for-broker-0>.<custom-domain>.-
Helm + Operator
-
Helm
redpanda-cluster.yamlapiVersion: cluster.redpanda.com/v1alpha1 kind: Redpanda metadata: name: redpanda spec: chartRef: {} clusterSpec: external: enabled: true type: LoadBalancer domain: <custom-domain> addresses: - <hostname-for-broker-0> - <hostname-for-broker-1> - <hostname-for-broker-2>kubectl apply -f redpanda-cluster.yaml --namespace <namespace>-
--values
-
--set
custom-hostname.yamlexternal: enabled: true type: LoadBalancer domain: <custom-domain> addresses: - <hostname-for-broker-0> - <hostname-for-broker-1> - <hostname-for-broker-2>helm upgrade --install redpanda redpanda/redpanda --namespace <namespace> --create-namespace \ --values custom-hostname.yaml --reuse-values --waithelm upgrade --install redpanda redpanda/redpanda --namespace <namespace> --create-namespace \ --set external.enabled=true \ --set external.type=LoadBalancer \ --set external.domain=<custom-domain> \ --set "external.addresses={<hostname-for-broker0>,<hostname-for-broker1>,<hostname-for-broker2>}" \ --wait -
-
Create DNS records for each of your broker’s FQDNs, relative to the zone.
Create DNS records
When your brokers are configured to advertise a custom domain, the next step is to create DNS records that point the FQDNs at the load balancer instances. You can:
-
Create the DNS records manually.
-
Use ExternalDNS to manage DNS records.
Manual
-
Find the addresses for each of your load balancers.
-
Update the CNAME record for your domain so that each FQDN points to the correct load balancer’s address.
Hostname Load balancer <fqdn-for-broker-0><load-balancer-address-0><fqdn-for-broker-1><load-balancer-address-1><fqdn-for-broker-2><load-balancer-address-2> -
Wait for your DNS changes to be propagated.
-
Use your custom domain to communicate with the Redpanda cluster from outside the Kubernetes cluster:
rpk cluster info -X brokers=<hostname>.<custom-domain>:31092
ExternalDNS
ExternalDNS is a tool for Kubernetes that manages DNS records. Whenever you add, change, or remove Kubernetes Services or Ingresses, ExternalDNS automatically makes the same updates to the DNS records by communicating with DNS providers through their public APIs. This communication keeps your DNS records up to date with your Kubernetes Services.
-
Ensure that you have a DNS zone available where ExternalDNS can create DNS records. See the supported DNS providers in the ExternalDNS documentation.
-
Deploy ExternalDNS in your Kubernetes cluster. For an example manifest, see the ExternalDNS documentation.
Set the
--providerflag to your DNS provider.The txtOwnerIdandintervalflags are recommended. ThetxtOwnerIdflag prevents DNS record conflicts between different instances of ExternalDNS. Theintervalflag controls the sync period with the DNS provider. -
Enable ExternalDNS in the Redpanda Helm chart:
-
Helm + Operator
-
Helm
redpanda-cluster.yamlapiVersion: cluster.redpanda.com/v1alpha1 kind: Redpanda metadata: name: redpanda spec: chartRef: {} clusterSpec: external: externalDns: enabled: truekubectl apply -f redpanda-cluster.yaml --namespace <namespace>- --values
-
enable-external-dns.yamlexternal: externalDns: enabled: true
helm upgrade --install redpanda redpanda/redpanda --namespace <namespace> --create-namespace \ --values enable-external-dns.yaml --reuse-values --wait- --set
-
helm upgrade --install redpanda redpanda/redpanda --namespace <namespace> --create-namespace \
  --set external.externalDns.enabled=true \
  --wait
-
When external.externalDns is enabled, each LoadBalancer Service is annotated with external-dns.alpha.kubernetes.io/hostname and the value is set to the configured FQDN of each Redpanda broker.
ExternalDNS will now automatically create DNS records for your Redpanda brokers, update the records if the LoadBalancer Services change, and delete them if you delete the Service.
Advertise the default addresses of the load balancer instances
You can configure each Redpanda broker to advertise the DNS name or IP address of its corresponding load balancer instance.
|
If your cluster has TLS enabled (default), you must Advertise a custom domain. The Helm chart adds custom domains to the SAN list of TLS certificates and not IP addresses. Therefore, IP addresses assigned to LoadBalancer Services must be made resolvable by DNS names to ensure secure TLS access. While adding entries to the |
If you’re hosting Redpanda on a managed Kubernetes platform, follow the Managed Kubernetes steps. Otherwise, follow the Bare metal steps.
Managed Kubernetes
-
Deploy Redpanda with TLS disabled and enable the LoadBalancer Service type:
-
Helm + Operator
-
Helm
redpanda-cluster.yamlapiVersion: cluster.redpanda.com/v1alpha1 kind: Redpanda metadata: name: redpanda spec: chartRef: {} clusterSpec: external: enabled: true type: LoadBalancer tls: enabled: falsekubectl apply -f redpanda-cluster.yaml --namespace <namespace>-
--values
-
--set
loadbalancer-tls-disabled.yamlexternal: enabled: true type: LoadBalancer tls: enabled: falsehelm upgrade --install redpanda redpanda/redpanda --namespace <namespace> --create-namespace \ --values loadbalancer-tls-disabled.yaml --reuse-values --waithelm upgrade --install redpanda redpanda/redpanda --namespace <namespace> --create-namespace \ --set external.enabled=true \ --set external.type=LoadBalancer \ --set tls.enabled=false \ --wait -
-
Make sure that your managed Kubernetes platform assigned external addresses to your LoadBalancer Services:
kubectl get service --namespace <namespace>Example output:
NAME               TYPE           CLUSTER-IP       EXTERNAL-IP
lb-redpanda-0      LoadBalancer   10.100.113.102   loadbalancer1.com
lb-redpanda-1      LoadBalancer   10.100.53.8      loadbalancer2.com
lb-redpanda-2      LoadBalancer   10.100.231.13    loadbalancer3.com
-
Configure the Redpanda brokers to advertise these external addresses:
-
Helm + Operator
-
Helm
redpanda-cluster.yamlapiVersion: cluster.redpanda.com/v1alpha1 kind: Redpanda metadata: name: redpanda spec: chartRef: {} clusterSpec: external: enabled: true type: LoadBalancer addresses: - <load-balancer-for-broker-0> - <load-balancer-for-broker-1> - <load-balancer-for-broker-2> tls: enabled: falsekubectl apply -f redpanda-cluster.yaml --namespace <namespace>helm upgrade redpanda redpanda/redpanda --namespace <namespace> --set $(kubectl get svc --namespace <namespace> -o jsonpath='{"external.addresses={"}{ range .items[*]}{.status.loadBalancer.ingress[0].ip }{.status.loadBalancer.ingress[0].hostname}{","}{ end }{"}\n"}') --reuse-values --wait -
-
Use the load balancers' addresses to communicate with the Redpanda cluster from outside the Kubernetes cluster:
rpk cluster info -X brokers=<load-balancer-address>:31092
Bare metal
-
Deploy Redpanda with TLS disabled and enable the LoadBalancer Service type:
-
Helm + Operator
-
Helm
redpanda-cluster.yamlapiVersion: cluster.redpanda.com/v1alpha1 kind: Redpanda metadata: name: redpanda spec: chartRef: {} clusterSpec: external: enabled: true type: LoadBalancer tls: enabled: falsekubectl apply -f redpanda-cluster.yaml --namespace <namespace>-
--values
-
--set
loadbalancer-tls-disabled.yamlexternal: enabled: true type: LoadBalancer tls: enabled: falsehelm upgrade --install redpanda redpanda/redpanda --namespace <namespace> --create-namespace \ --values loadbalancer-tls-disabled.yaml --reuse-values --waithelm upgrade --install redpanda redpanda/redpanda --namespace <namespace> --create-namespace \ --set external.enabled=true \ --set external.type=LoadBalancer \ --set tls.enabled=false \ --wait -
-
Find the node ports that each LoadBalancer Service exposes:
kubectl get service --namespace <namespace>Example output:
NAME               TYPE           CLUSTER-IP      EXTERNAL-IP   PORT(S)
lb-redpanda-0      LoadBalancer   10.96.162.129   <pending>     31644:30733/TCP,31092:30951/TCP,30082:30158/TCP,30081:32404/TCP   4m49s
lb-redpanda-1      LoadBalancer   10.96.53.61     <pending>     31644:30274/TCP,31092:32483/TCP,30082:30779/TCP,30081:30420/TCP   4m49s
lb-redpanda-2      LoadBalancer   10.96.203.230   <pending>     31644:32025/TCP,31092:30424/TCP,30082:30611/TCP,30081:32080/TCP
-
Create one load balancer instance outside of your Kubernetes cluster for each worker node that runs Redpanda, and forward the traffic to the node ports that are opened by the LoadBalancer Services.
-
Add the DNS names or IP addresses of your load balancer instances to the
external.addressesfield in order of the StatefulSet replicas. For example, the first address in the list is assigned toredpanda-0, the second is assigned toredpanda-1, and so on.-
Helm + Operator
-
Helm
redpanda-cluster.yamlapiVersion: cluster.redpanda.com/v1alpha1 kind: Redpanda metadata: name: redpanda spec: chartRef: {} clusterSpec: external: enabled: true type: LoadBalancer addresses: - <load-balancer-for-broker-0> - <load-balancer-for-broker-1> - <load-balancer-for-broker-2> tls: enabled: falsekubectl apply -f redpanda-cluster.yaml --namespace <namespace>helm upgrade --install redpanda redpanda/redpanda --namespace <namespace> --create-namespace \ --set "external.addresses={<load-balancer-for-redpanda-0>,<load-balancer-for-redpanda-1>,<load-balancer-for-redpanda-2>}" --reuse-values --wait -
-
Use the load balancers' addresses to communicate with the Redpanda cluster from outside the Kubernetes cluster:
rpk cluster info -X brokers=<lb-redpanda-0>:31092