# Benchmark Redpanda
> For the complete documentation index, see [llms.txt](https://docs.redpanda.com/llms.txt). Component-specific: [streaming-full.txt](https://docs.redpanda.com/streaming-full.txt)
---
title: Benchmark Redpanda
latest-redpanda-tag: v25.2.1
latest-console-tag: v3.7.3
latest-operator-version: v26.1.4
# EOL = End-of-Life (support lifecycle status)
page-is-nearing-eol: "true"
page-is-past-eol: "false"
page-eol-date: July 31, 2026
latest-connect-version: 4.93.0
docname: benchmark
page-component-name: streaming
page-version: "25.2"
page-component-version: "25.2"
page-component-title: Streaming
page-relative-src-path: benchmark.adoc
page-edit-url: https://github.com/redpanda-data/docs/edit/v/25.2/modules/develop/pages/benchmark.adoc
description: Learn how to measure the performance of a Redpanda cluster deployed on AWS EC2 instances with the OpenMessaging Benchmark.
page-git-created-date: "2023-07-24"
page-git-modified-date: "2024-07-25"
support-status: nearing end-of-life
---
Learn how to measure the performance of a Redpanda cluster deployed on AWS EC2 instances with the Linux Foundation’s OpenMessaging Benchmark. Run the same tests and workloads that Redpanda uses to demonstrate significantly better performance than Apache Kafka.
## [](#about-openmessaging-benchmark)About OpenMessaging Benchmark
The [Linux Foundation’s OpenMessaging Benchmark](https://openmessaging.cloud/docs/benchmarks/) (OMB) Framework is an open-source, cloud-based benchmark framework that supports several messaging systems, including Kafka, and is configurable for workloads representing real-world use cases.
Redpanda Data provides a [fork of OMB on Github](https://github.com/redpanda-data/openmessaging-benchmark) with some updates:
- Fixed coalescing of asynchronous consumer offset requests in the OMB Kafka driver.
- Support for Kafka 3.2.0 clients.
### [](#omb-workloads)OMB workloads
An OMB workload is a benchmark configuration that sets the producers, consumers, topics, and messages used by a test, as well as the production rate and duration of each test. An OMB workload is specified in a YAML configuration file.
Example workload configuration file
The content of an OMB workload configuration file, copied from Redpanda Data’s [fork of OMB](https://github.com/redpanda-data/openmessaging-benchmark/blob/main/workloads/1-topic-1-partition-1kb.yaml):
```none
name: 1 topic / 1 partition / 1Kb
topics: 1
partitionsPerTopic: 1
keyDistributor: "NO_KEY"
messageSize: 1024
payloadFile: "payload/payload-1Kb.data"
subscriptionsPerTopic: 1
consumerPerSubscription: 1
producersPerTopic: 1
producerRate: 50000
consumerBacklogSizeGB: 0
testDurationMinutes: 15
```
The `keyDistributor` property configures how keys are distributed and assigned to messages. - `NO_KEY` sets `null` for all keys. - `KEY_ROUND_ROBIN` cycles through a finite set of keys in round-robin fashion. - `RANDOM_NANO` returns random keys based on `System.nanoTime()`.
## [](#set-up-benchmark)Set up benchmark
Running OMB with Redpanda requires setting up your local environment to provision and start a Redpanda cluster in AWS.
1. Install CLI tools.
- [Maven](https://maven.apache.org/install.html)
- [Terraform](https://developer.hashicorp.com/terraform/downloads) with [terraform-inventory plugin](https://github.com/adammck/terraform-inventory)
- [Ansible](https://docs.ansible.com/ansible/latest/installation_guide/intro_installation.html) (v2.11 or higher)
- Python 3 and pip
- A window manager like [tmux](https://github.com/tmux/tmux/wiki) or [screen](https://linux.die.net/man/1/screen) that supports detachable screen sessions.
> 💡 **TIP**
>
> Redpanda Data recommends running the benchmark executable with a window manager that supports detachable screen sessions, like tmux or screen, so the benchmark can continue to run in the background even after you disconnect.
2. Clone the Redpanda Data fork of OMB.
```bash
git clone https://github.com/redpanda-data/openmessaging-benchmark
```
The repository contains a directory for the Redpanda driver, `openmessaging-benchmark/driver-redpanda`. Subsequent steps read and configure files in that directory.
3. Customize the `openmessaging-benchmark/driver-redpanda/pom.xml` file with your Kafka client version if necessary (currently 3.3.1):
`pom.xml`
```xml
...
org.apache.kafka
kafka-clients
3.3.1
...
```
4. From the repository root directory, build the benchmark client.
```bash
cd openmessaging-benchmark
mvn clean install -Dlicense.skip=true
```
5. From the Redpanda driver directory, install the Ansible roles required for deploying Redpanda.
```bash
cd driver-redpanda/deploy
ansible-galaxy install -r requirements.yaml
```
6. Configure AWS credentials and SSH keys.
1. [Install](https://aws.amazon.com/cli/) and [configure](https://docs.aws.amazon.com/cli/latest/userguide/cli-chap-getting-started.html) AWS CLI.
2. Generate SSH keys:
```bash
ssh-keygen -f ~/.ssh/redpanda_aws
```
When prompted for a passphrase, set a blank passphrase by pressing Enter twice.
3. Verify the SSH key files were created.
```bash
ls ~/.ssh/redpanda_aws*
```
7. Provision a Redpanda cluster to deploy on AWS with Terraform.
1. Customize the `openmessaging-benchmark/deploy/terraform.tfvars` Terraform configuration file for your environment.
Default Terraform configuration for Redpanda on AWS
The default contents of `openmessaging-benchmark/driver-redpanda/deploy/terraform.tfvars`:
```none
public_key_path = "~/.ssh/redpanda_aws.pub"
region = "us-west-2"
az = "us-west-2a"
ami = "ami-0d31d7c9fc9503726"
profile = "default"
instance_types = {
"redpanda" = "i3en.6xlarge"
"client" = "m5n.8xlarge"
"prometheus" = "c5.2xlarge"
}
num_instances = {
"client" = 4
"redpanda" = 3
"prometheus" = 1
}
```
2. From the Redpanda driver deployment directory, initialize the Terraform deployment of Redpanda on AWS.
```bash
cd driver-redpanda/deploy
terraform init
terraform apply -auto-approve
```
> 📝 **NOTE**
>
> The `terraform apply` command prompts you for an owner name (`var.owner`) that is used to tag all the cloud resources that will be created. Once the installation is complete, you will see a confirmation message listing the resources that have been installed.
8. Run the Ansible playbook to install and start the Redpanda cluster.
Redpanda can run with or without TLS and SASL enabled.
- To run Redpanda **without TLS and SASL**:
```bash
ansible-playbook deploy.yaml
```
- To run Redpanda **with TLS and SASL**:
```bash
ansible-playbook deploy.yaml -e "tls_enabled=true sasl_enabled=true"
```
If the path to your SSH private key isn’t `~/.ssh/redpanda_aws`, add the `--private-key` flag to your Ansible command.
```bash
ansible-playbook deploy.yaml --private-key=
```
> 📝 **NOTE**
>
> Beginning with Ansible 2.14, references to `args: warn` within Ansible tasks cause a fatal error and halt the execution of the playbook. You may find instances of this in the components installed by `ansible-galaxy`, particularly in the `cloudalchemy.grafana` task in `dashboards.yml`. To resolve this issue, removing the `warn` line in from the yml file.
## [](#run-benchmark)Run benchmark
Connect to the benchmark’s client and run the benchmark with a custom workload.
1. Connect with SSH to the benchmark client, with its IP address retrieved from the `client_ssh_host` output of Terraform.
```bash
ssh -i ~/.ssh/redpanda_aws ubuntu@$(terraform output --raw client_ssh_host)
```
2. On the client, navigate to the `/opt/benchmark` directory.
```bash
cd /opt/benchmark
```
3. Create a workload configuration file. For example, create a `.yaml` file with one topic, 144 partitions, 500 MBps producer rate, four producers, and four consumers:
```bash
cat > workloads/1-topic-144-partitions-500mb-4p-4c.yaml << EOF
name: 500mb/sec rate; 4 producers 4 consumers; 1 topic with 144 partitions
topics: 1
partitionsPerTopic: 144
messageSize: 1024
useRandomizedPayloads: true
randomBytesRatio: 0.5
randomizedPayloadPoolSize: 1000
subscriptionsPerTopic: 1
consumerPerSubscription: 4
producersPerTopic: 4
producerRate: 500000
consumerBacklogSizeGB: 0
testDurationMinutes: 30
EOF
```
Alternatively, you can use an existing workload file from the Redpanda repo, in `openmessaging-benchmark/driver-redpanda/deploy/workloads/`.
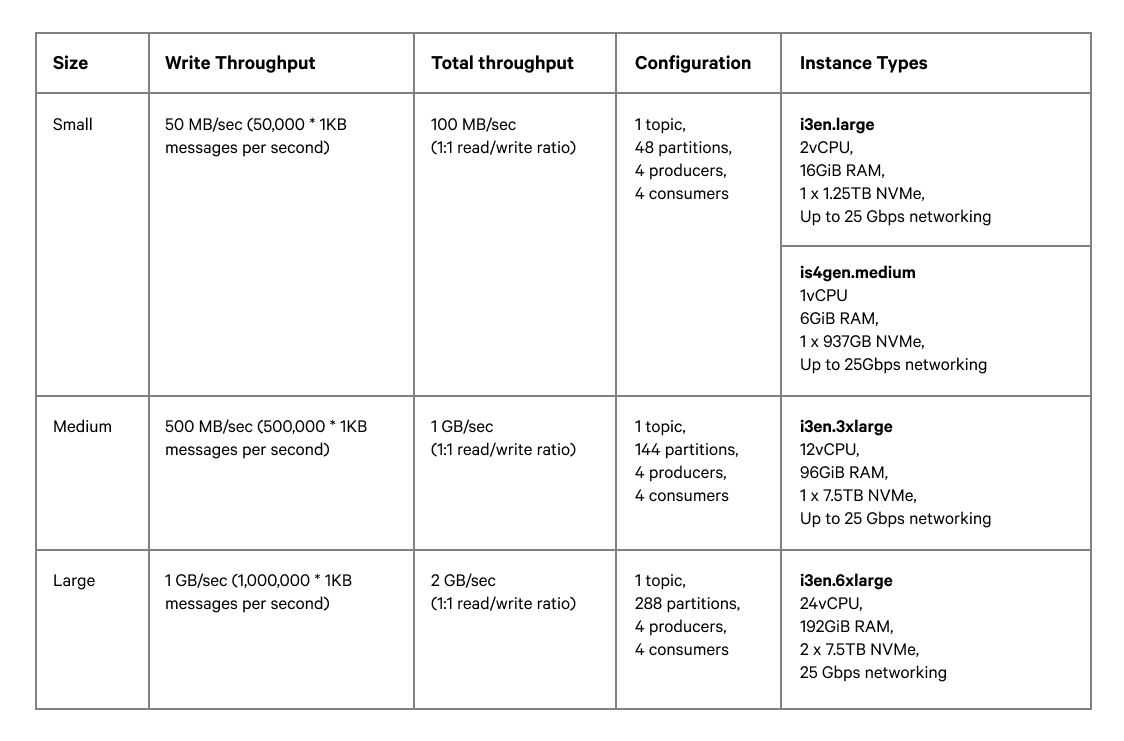
Workloads from Redpanda vs. Kafka comparison
The workloads from the [Redpanda vs. Kafka benchmark comparison](https://redpanda.com/blog/redpanda-vs-kafka-performance-benchmark) can be gotten from the chart in the comparison:
4. Create or reuse a client configuration file. This file configures the Redpanda producer and consumer clients, as well as topics.
The rest of the guide uses the `openmessaging-benchmark/driver-redpanda/redpanda-ack-all-group-linger-1ms.yaml` configuration file.
Client configuration from Redpanda vs. Kafka comparison
The client configuration from the [Redpanda vs. Kafka benchmark comparison](https://redpanda.com/blog/redpanda-vs-kafka-performance-benchmark) can be gotten from the code listing in the comparison:
```yaml
topicConfig: |
min.insync.replicas=2
flush.messages=1
flush.ms=0
producerConfig: |
acks=all
linger.ms=1
batch.size=131072
consumerConfig: |
auto.offset.reset=earliest
enable.auto.commit=false
auto.commit.interval.ms=0
max.partition.fetch.bytes=131072
```
> 💡 **TIP**
>
> Configure `reset=false` and manually delete the generated topic after the benchmark completes. Otherwise, when `reset=true`, the benchmark can fail due to it erroneously trying to delete the `_schemas` topic.
5. Run the benchmark with your workload and client configuration.
```bash
sudo bin/benchmark -d \
driver-redpanda/redpanda-ack-all-group-linger-1ms.yaml \
workloads/1-topic-144-partitions-500mb-4p-4c.yaml
```
## [](#view-benchmark-results)View benchmark results
After a run completes, the benchmark generates results as `*.json` files in `/opt/benchmark`.
Redpanda provides a Python script, `generate_charts.py`, to generate charts of benchmark results. To run the script:
1. Copy the results from the client to your local machine.
```bash
exit; # back to your local machine
mkdir ~/results
scp -i ~/.ssh/redpanda_aws ubuntu@$(terraform output --raw client_ssh_host):/opt/benchmark/*.json ~/results/
```
2. From the root directory of the repository, install the prerequisite packages for the Python script.
```bash
cd ../../bin # openmessaging-benchmark/bin
python3 -m pip -r install requirements.txt
```
3. To list all options, run the script with the `-h` flag.
```bash
./generate_charts.py -h
```
4. To generate charts from your `~/results/` directory, first create an `~/output` directory, then run the script with `--results` and `--output` options set accordingly.
```bash
mkdir ~/output
./generate_charts.py --results ~/results --output ~/output
```
5. In `~/output`, verify the generated charts are in an HTML page with charts for throughput, publish latency, end-to-end latency, publish rate, and consume rate.
## [](#tear-down-benchmark)Tear down benchmark
When done running the benchmark, tear down the Redpanda cluster.
```bash
terraform destroy -auto-approve
```
## [](#suggested-reading)Suggested reading
- [Redpanda vs. Apache Kafka: A performance comparison (2022 update)](https://redpanda.com/blog/redpanda-vs-kafka-performance-benchmark)
- [Performance update: Redpanda vs. Kafka with KRaft](https://redpanda.com/blog/kafka-kraft-vs-redpanda-performance-2023)
- [Why `fsync()`: Losing unsynced data on a single node leads to global data loss](https://redpanda.com/blog/why-fsync-is-needed-for-data-safety-in-kafka-or-non-byzantine-protocols)