Configure Role-Based Access Control
|
This feature requires an Enterprise license. To upgrade, contact Redpanda sales. |
Role-based access control (RBAC) provides a way to configure permissions for provisioned users at scale, and provides a streamlined interface to manage user access to many resources. RBAC works in conjunction with all supported authentication methods.
Redpanda only supports RBAC for self-hosted clusters. Configuration is supported through the command line using rpk and through the Redpanda Console.
|
RBAC
RBAC is designed to address the critical challenge of access management at scale. It alleviates the process of manually maintaining and verifying a set of raw permissions (access control lists, or ACLs) for a user base that may contain thousands of users. RBAC provides a method to onboard new employees easier, audit accesses faster, and adapt more readily to evolutions of usage and compliance needs.
Using RBAC, you can define roles to reflect organizational structure or job duties. This approach decouples users and permissions through the assignment of roles. RBAC allows a one-to-many mapping of a given role to many users, dramatically reducing the number of custom policies needed for a resource from one per user, to one per group of users.
RBAC terminology
Under the RBAC framework, you create roles, grant permissions to those roles, and assign the roles to users. When you change the permissions for a given role, all users with that role automatically gain the modified permissions. You grant or deny permissions for a role by creating an ACL and specifying the RBAC role as either allowed or denied respectively.
Redpanda treats all users as security principals and defines them with the Type:Name syntax (for example, User:mike). You may omit the Type when defining a principal and Redpanda will assume the User: type. All examples here use the full syntax for clarity.
See access control lists for more information on defining ACLs and working with principals.
Roles
A role is a named collection of ACLs which may have users (security principals) assigned to it. You can assign any number of roles to a given user. When installing a new Redpanda cluster, no roles are provisioned by default. If you wish to use RBAC, you will need to create your first roles using your superuser account.
See configure authentication for more information on creating and managing superusers.
When performing an upgrade from older versions of Redpanda, all existing SASL/SCRAM users are assigned to the placeholder Users role to help you more readily migrate away from pure ACLs. As a security measure, this default role has no assigned ACLs. You will need to use your superuser account to create additional roles and assign appropriate ACLs as necessary.
Policy conflicts
You can assign a combination of ACLs and roles to any given principal. ACLs allow permissions, deny permissions, or specify a combination of both. As a result, users may at times have role assignments with conflicting policies. If this situation arises, the user is permitted to perform an operation if and only if:
-
There does not exist a DENY permission matching the operation.
-
There exists an ALLOW permission matching the operation.
RBAC example
Consider a scenario where your software engineers use a set of private topics to publish application update information to users. All your private topics begin with the prefix private-. You might create a new SoftwareEng role to represent the software engineers with write access to these private topics. You would then assign the SoftwareEng role as the allowed role for a new ACL specifying read and write permissions to private-*. Using a wildcard includes all existing private topics and any new ones you might create later. You then assign the new role to John and Jane, your two software engineers who will write messages to this topic. The rpk commands to accomplish this are:
rpk security role create SoftwareEng &
rpk security acl create --operation read --operation write --topic private-* --allow-role SoftwareEng &
rpk security role assign SoftwareEng --principal User:john,User:jane
This diagram shows the relationships between users, roles, and ACLs:
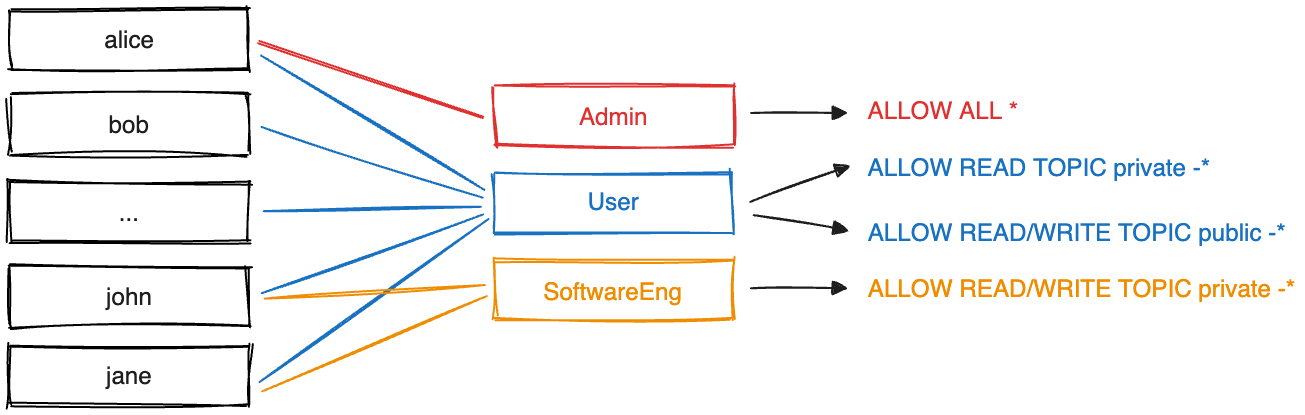
Building off the diagram, consider the situation where you want to create a new topic, private-software-versions, where users self-report the version of a component they are using. If you were using the ACL authorization mechanism, you would need to assign this ACL to every user in your Redpanda installation. Using RBAC allows you to make one update and apply it to everyone with that role. Adding the write permissions for this topic to the User role means everyone with that role (which in our diagram is all authenticated users) gains the authorization immediately. The rpk command to accomplish this is:
rpk security acl create --operation write --topic private-software-versions --allow-role UserManage users and roles
Redpanda allows you to manage your RBAC configurations through the use of rpk, through the Redpanda Admin API, and through Redpanda Console. Examples of using rpk for each RBAC operation, along with steps for making changes with Redpanda Console, are given here.
Create a role
Creating a new role is a two-step process. First you define the role, giving it a unique and descriptive name. Second, you assign one or more ACLs to allow or deny access for the new role. This defines the permissions that are inherited by all users assigned to the role. It is possible to have an empty role with no ACLs assigned.
-
rpk
-
Redpanda Console
Administrators use rpk to create a new role by issuing the command:
rpk security role create <role_name>After the role is created, administrators create new ACLs and assign this role either allow or deny permissions. For example:
rpk security acl create ... --allow-role <role_name>Example of creating a new role named red:
rpk security role create redSuccessfully created role "red"Administrators use Redpanda Console to create a new role by following these steps:
-
Select
Securityfrom the left navigation menu. -
Select the
Rolestab. -
Click Create Role.
-
In the
Create Roleview, provide a name for the role and an optional origin host for users to connect from. -
Define the permissions (ACLs) for the role. You may create ACLs for topics, consumer groups, and transactional IDs.
-
(Optional) You may assign one or more principals (users) to the role as part of creating it.
-
Click Create.
Delete a role
When a role is deleted, Redpanda carries out the following actions automatically:
-
All role ACLs are deleted.
-
All users' assignments to the role are removed.
Redpanda lists all impacted ACLs and role assignments when executing this command. You will receive a prompt to confirm the deletion action. The delete operation is irreversible.
-
rpk
-
Redpanda Console
Using rpk, administrators delete a role by issuing the command:
rpk security role delete <role-name>Example of deleting a role named red:
rpk security role delete redPERMISSIONS
===========
PRINCIPAL HOST RESOURCE-TYPE RESOURCE-NAME RESOURCE-PATTERN-TYPE OPERATION PERMISSION ERROR
RedpandaRole:red * TOPIC books LITERAL ALL ALLOW
RedpandaRole:red * TOPIC videos LITERAL ALL ALLOW
PRINCIPALS (1)
==============
NAME TYPE
panda User
? Confirm deletion of role "red"? This action will remove all associated ACLs and unassign role members Yes
Successfully deleted role "red"Administrators use Redpanda Console to delete an existing role by following these steps:
-
Select
Securityfrom the left navigation menu. -
Click the role you wish to delete. This will show all currently assigned permissions (ACLs) and principals (users).
-
Click Delete.
-
Redpanda Console shows you a prompt asking you to confirm deletion of the role. The prompt differs based on whether you have principals assigned to the role or not. If you have principals assigned to the role, you must type the role name in the input field where prompted before you may continue.
-
Click Delete.
Assign a role
Administrators may assign a role to any security principal. Principals are referred to using the format: Type:Name. Redpanda currently supports only the User type. If you omit the type, Redpanda assumes the User type by default. With this command you may assign the role to multiple principals at the same time by using a comma separator between each principal.
-
rpk
-
Redpanda Console
Using rpk, administrators assign a role to a principal by issuing the command:
rpk security role assign <role-name> --principal <principals>Example of assigning a role named red:
rpk security role assign red --principal bear,pandaSuccessfully assigned role "red" to
NAME PRINCIPAL-TYPE
bear User
panda UserAdministrators have two options with Redpanda Console to add a role to a principal:
Option 1, using the Edit Role view:
-
Select
Securityfrom the left navigation menu. -
Select the
Rolestab. -
Find the role you wish to assign to one or more principals and then click on the role name.
-
Click Edit.
-
Below the list of permissions, find the
Principalssection. You may add any number of principals to the role at a time. -
Once you have listed all new principals, click Update.
Option 2, using the Edit User view:
-
Select
Securityfrom the left navigation menu. -
Select the
Userstab. -
Find the user you wish to assign one or more roles to then click the user’s name.
-
Using the
Assign Rolesinput field, list the roles you wish to add to this user. -
Once you have added all desired roles, click Update.
Unassign a role
Administrators may remove a role assignment from a security principal without deleting the role. Principals are referred to using the format: Type:Name. Redpanda currently supports only the User type. If you omit the type, Redpanda assumes the User type by default. With this command you may remove the role from multiple principals at the same time by using a comma separator between each principal.
-
rpk
-
Redpanda Console
Using rpk, administrators remove a role assignment from a principal by issuing the command:
rpk security role unassign <role_name> --principal <principals>Example of unassigning a role named red:
rpk security role unassign red --principal pandaSuccessfully unassigned role "red" from
NAME PRINCIPAL-TYPE
panda UserAdministrators have two options with Redpanda Console to remove a role from a principal:
Option 1, using the Edit Role view:
-
Select
Securityfrom the left navigation menu. -
Select the
Rolestab. -
Find the role you wish to assign to one or more principals and then click on the role name.
-
Click Edit.
-
Below the list of permissions, find the
Principalssection. Click x beside the name of any principals you wish to remove from the role. -
Once you have removed all needed principals, click Update.
Option 2, using the Edit User view:
-
Select
Securityfrom the left navigation menu. -
Select the
Userstab. -
Find the user you wish to remove from one or more roles and then click the user’s name.
-
Click x beside the name of any roles you wish to remove this user from.
-
Once you have removed the user from all desired roles, click Update.
Edit role permissions
Administrators may add or remove ACLs from any of the roles they have previously created.
-
rpk
-
Redpanda Console
Using rpk, administrators can modify an existing role by adding additional ACLs to it using the command:
rpk security acl create ... --allow-role <role_name>rpk security acl create ... --deny-role <role_name>Administrators may also use rpk to remove ACLs from a role by using the command:
rpk security acl delete ... --allow-role <role_name>
rpk security acl delete ... --deny-role <role_name>
When you execute the rpk security acl delete command, Redpanda deletes all ACLs matching the parameters supplied. Make sure to match the exact ACL you want to delete. If you supply only the --allow-role parameter, for example, Redpanda will delete every ACL granting that role authorization to a resource.
To list all the ACLs associated with a role, administrators may use the command:
rpk security acl list --allow-role <role_name> --deny-role <role_name>See also:
-
Access Control Lists for more information on defining and using ACLs.
Administrators use Redpanda Console to edit the ACLs for an existing role by following these steps:
-
Select
Securityfrom the left navigation menu. -
Select the
Rolestab. -
Find the role you wish to assign to one or more principals and then click on the role name.
-
Click Edit.
-
In the
Edit Roleview, you may update the optional origin host for users to connect from. -
You may add or remove existing (ACLs) for the role. As when creating a new role, you can create or modify ACLs for topics, consumer groups, and transactional IDs.
-
After making all desired changes, click Update.
List all roles
Redpanda allows administrators to view a list of all existing roles.
-
rpk
-
Redpanda Console
Using rpk, administrators can view a list of all actives roles by issuing the command:
rpk security role listExample of listing all roles:
rpk security role listNAME
redAdministrators use Redpanda Console to view all existing roles by following these steps:
-
Select
Securityfrom the left navigation menu. -
Select the
Rolestab.
All roles are listed in a paginated view. You may also filter the view using the input field at the top of the list.
Describe a role
When managing roles, you may need to review the ACLs the role grants or the list of principals assigned to the role.
-
rpk
-
Redpanda Console
Using rpk, administrators can view the details of a given role by issuing the command:
rpk security role describe <role_name>Example of describing a role named red:
rpk security role describe redPERMISSIONS
===========
PRINCIPAL HOST RESOURCE-TYPE RESOURCE-NAME RESOURCE-PATTERN-TYPE OPERATION PERMISSION ERROR
RedpandaRole:red * TOPIC books LITERAL ALL ALLOW
RedpandaRole:red * TOPIC videos LITERAL ALL ALLOW
PRINCIPALS (1)
==============
NAME TYPE
panda UserAdministrators use Redpanda Console to view details of an existing role by following these steps:
-
Select
Securityfrom the left navigation menu. -
Select the
Rolestab. -
Find the role you wish to view and click the role name.
All roles are listed in a paginated view. You may also filter the view using the input field at the top of the list.